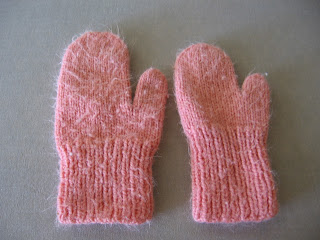
One of the few clothing items that my
parents have kept from my childhood are a pair of salmon pink mittens
that were knitted by my paternal grandmother. My grandmother wasn't
exactly the cookie baking type, but she scored
a domestic home run when she presented the mittens to me (and an
identical, smaller pair for my younger sister). I had these special
mittens in mind when I embarked on my own mitten making adventure.
 |
| One bigger for the older sis, one smaller for the lil' miss |
Nowadays pretty mittens can be
purchased at most clothing stores; I'm sure Gap and JCrew make nice
ones with embroidered animals or snowflakes. However, I don't think
anything quite matches homemade mittens in terms of coziness and
satisfaction. See my results below.
 |
| Silver and sparkly! |
I'm impressed they turned out looking
quite professional (meaning they look like they could be sold in a
store), but they are super special because I made them myself (which
means they would make great gifts!). I definitely experienced one of
those OMG! knitting moment where everything works out well and I was
in awe that I crafted something so amazing (I know, I know, I'm
tooting my own horn, but I was super excited!).
The only problem was that there were
small holes at the point where the thumb joins the body of the
mitten. The pattern had asked that I slip 7 stitches onto waste yarn
for the thumb and continue knitting the body of the mitten. Then,
when the body was completed, go back and pick up 9 stitches around
the thumb opening opposite the slipped stitches. I followed these
instructions to a T, but it was pretty obvious before I had even
finished the thumb that I would have some holes.
 |
| One of the holes where thumb and body join is circled |
 |
| (1) These were the stitches that were picked up (2) Hole is formed where the thumb and body join (3) The stitches underneath the thumb were the stitches saved on the waste yarn |
I have heard of 2 ways to correct this
problem. (1) Leave a long tail when picking up stitches. Use the tail
to weave around the stitches near the hole and pull to tighten and
reduce the size of the hole. (2) Pick up more stitches than necessary
around the thumbhole and reduce by the same number of added stitches
in the next round. If you forget to reduce, the thumb will be too
wide.
I tried Method 1, but unfortunately,
since the holes are on opposite sides of the thumbhole, it only
worked to close up one of the holes (and not very well at that). Next
time I will give Method 2 a try; I will let you know what happens!
 |
| Mittens for all! |


